Introduction:
In my recent project, I got a chance to build a test automation framework from scratch. Apparently one of the most important steps was to finalize which test automation tool would suit best for the target application. Since I already had experience with Selenium, I knew some of its limitations for web apps that use some front-end framework, so I decided to go with Playwright.
After finalizing the tool, creating a test automation framework in Playwright and completing the API/ UI test cases, my next task was to enable other team members (Automation engineers as well as manual QAs) to start running these test cases in a staging environment. The basic and not-so-preferred approach was to set it up on everyone’s machine but obviously it had a lot of concerns such as technical capabilities of the person running test cases, manual intervention every time execution was required and no central place for reports. Hence, I decided to automate the execution of these test cases. In order to achieve this, I decided to first create a separate test automation pipeline in Bitbucket and then merge it with the existing dev pipeline.
So, this article focuses on how to automate the execution of API or UI test cases so that they can run as soon as a new build is deployed. The end goal is to enable QAs to create their own pipeline and then finally this pipeline (or steps) can be merged into an existing pipeline (If exists) so that test cases execution is triggered automatically once the code is deployed to a specific environment. Few of the most valued benefits of automating execution of the test cases are:
- It increases project stakeholders’ confidence.
- Increases visibility about build stability.
- It helps in making decisions whether the latest build should go to production or not.
In my current project, I added 34 test cases for now and it consists of a combination of API and UI test cases. As I mentioned earlier, I am using playwright with JavaScript and node as a runtime environment.
Prerequisites:
- A bitbucket account.
- A repository in bitbucket.
- A branch in that repository which triggers the pipeline and execution of test cases. This branch should have the latest and stable version of code (It should contain the test cases of course!)
After we have the prerequisites mentioned above, please follow these steps:
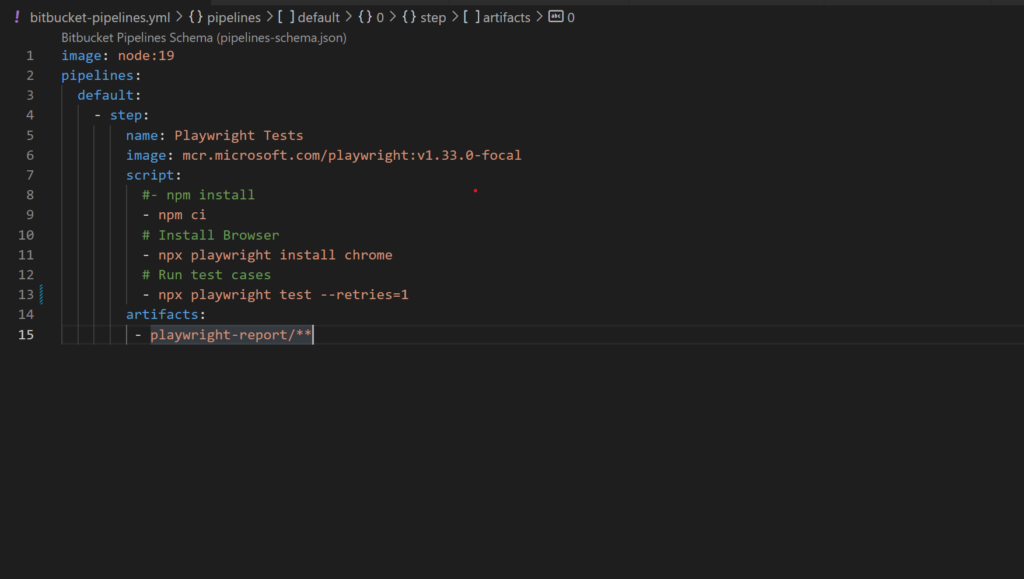
- Add bitbucket-pipelines.yml file to the root of your project. This step is the most important one. Otherwise, the configured pipeline won’t run as it always looks for an yml file in your checked in code. It looks like below.

- Add required steps to your yml file: This means that we need to tell the pipeline what steps need to be run and in what sequence.
- image: This tells the execution engine which docker image is to be used for spinning an environment. As I am using node for my framework which is an open source, cross platform JavaScript runtime environment, I used its official node docker image with a specific version.
- Piplelines:
- name: Specify the name of your pipeline. In my case I added “Playwright testcases”.
- image: Since Bitbucket Pipelines can use public Docker images as build environments. So in this step, you would provide the latest playwright docker image where your actual test cases will run. By default, it uses Linux (Ubuntu) as an underlying operating system. Check out https://hub.docker.com for the latest available images. They get updated every now and then. I used mcr.microsoft.com/playwright:v1.33.0-focal image.
- script: This is where we would mention the execution steps:
- npm ci: I am using npm as a package manager, but any other package manager can be also used like yarn. npm ci will install the dependencies that you require to run the test cases like node modules. This command will refer to the dependencies mentioned in your package.json and package-lock.json file. And it will make sure you’re doing a clean install of your dependencies.
- Install chrome: Self-explanatory. Any other browser can be used but it should also be mentioned in your playwright.config file. Otherwise, the playwright cannot understand which browser is to be used for the execution of the test cases.
- npx playwright test: This is the command to run all the test cases. Keyword test will try to find any folder with name test in it and will pick up test cases automatically. Pipeline will fail if any of the test cases failed notifying us by email at any point, but failure percentage can also be configured. Note: We used npx instead of npm because npx will run the packages without installing it.
- artifacts: This is where you would add the path of the folder where reports, screenshots and logs are stored. The folder or files specified here will be available to download as artifacts once pipeline is executed successfully.
Below is my yml file that I added to my project:

- Next step is to commit your yml to your repository.
- Enable pipeline feature from your repository (Sometimes this feature does not appear due to limited permissions) when enabled, bitbucket will automatically start running the pipeline as soon as a new check-in is made in the branch.
- If everything is set up correctly and considering your test cases also pass, it would look like this:

If you go inside any pipeline, it will show all the logs for individual steps on the right hand side. You can click to view details about every step.

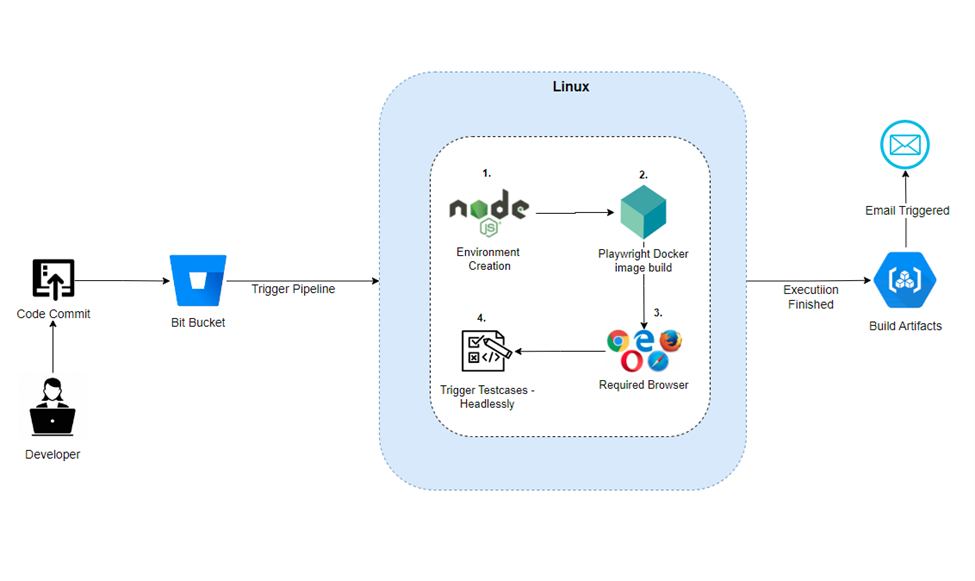
In order to understand it a bit better and to see how all pieces fall into place, I created this below diagram which explains the whole structure of the pipeline.

And that’s it! By now, you should have your pipeline ready. Cheers!


