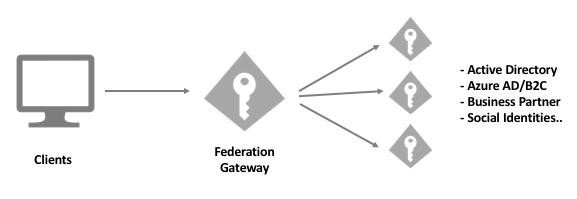
Introduction: This document is intended to configure Sitecore identity server to connect with Azure AD so that Azure AD users can login to the Sitecore CMS. In this approach Sitecore identity server will act as a federation gateway to external system. Azure AD is supported out of the box with Sitecore 10.2. The below image will give more clarity to the approach:

The whole Integration is divided into two sections:
- Azure Portal Configuration.
- Changes required in Sitecore Identity Server Configuration.
Azure Portal Configuration
The basic steps are as follows:
1. Create a new Active Directory: Login to User Azure Portal and click create resources and search for active directory and select the one which is marked red as mentioned below in the screenshot:

Once you create the active directory, switch to that specific directory, In this document we named it SitecoreCMS. Once it gets created, it will look like the below image:

2. Create a new group: Create a new group inside the newly created AD SitecoreCMS Directory. Click the group section which is highlighted in red as the image below: Once you click, you will get the option to create a new group. Set the Group type as Security and Group Name as Sitecoreusers , see below for reference:
Note – Once the group is created, capture the object id which is highlighted in red as in the below image. This object id will be used while configuring the identity server:

3. Create New User: Create a user in the newly created active directory (SitecoreCMS) as mentioned in the below image. While you create the users, go to the assignment tab and select the group which we have created in Step 2 (Sitecoreusers). The objective is to confine one type of users in one group which will be helpful when you assign a certain Sitecore role to a specific Group.

4. APP Registration: Create an APP Registration inside the newly created SitecoreCMS AD. To create a new APP registration. Click the APP Registration button as mentioned below:

Note- After creating the new APP Registration, Capture the client id and tenant id which will be used while configuring Identity server. Identity server communicates to this newly created APP Registration using this id. See the image mentioned below.

Once created, go to the Authentication section present at the left and populate the Redirect URIS (type should be web), Front Channel Log out URL and the token type should be ID token as mentioned in the below screen shot:

Note. Red highlighted value is the identity sever hostname. Change this value based on your local setup.
Update this Manifest-Select the Manifest section of the newly create APP registration and set the value of groupMembershipClaim to SecurityGroup as mentioned in the below image:

Set Permission to the APP Registered to the Newly Create Active Directory (Sitecore CMS)
Click the link in the highlighted area mentioned in the image below in the Newly APP registered.

Once you click it, go the permission section and set the permission to admin in the current active directory as mentioned below.

Assign groups or users to this APP registration: Go to the users and group section of this specific APP Registration (AzureADIntegration) and add the Users or Groups as mentioned in the below screenshot. By doing this, it means we are giving access to the group which we created inside SitecoreCMS active directory to this specific APP registration (AzureADIntegration)

Changes required in Sitecore Identity Server Configuration
Sitecore 10 has the out of box feature to get integrated with Azure AD. Go to the file system path of your hosted identity server.“Sitecore.Plugin.IdentityProvider.AzureAd.xml “open this to edit.
C:\inetpub\wwwroot\demositecoreidentityserver.dev.local\sitecore\Sitecore.Plugin.IdentityProvider.AzureAd\Config

Parameters need to be updated:
- Enabled: true
- ClientID : This value is the client of the App Registered in step 4 .In this document we are referring “AzureADIntegration” APP registered
- TenantID : This value is the Tenant id of the App Registered in step 4 .In this document we are referring to the “AzureADIntegration” APP registered.
Note: Once these value are updated, restart the app pool of the identity server to reflect the changes.
Once this is done, we will be able to see the Azure login button as shown below.

These changes are not enough to get login, it will just show you the azure login button we need to update a few more parameters of the same file.
Parameters need to be updated:
- AzureADUserToAdminUser: Un-comment this tag and place it after claimtransformation2 closing tag as mentioned in the image below:

Update the value of claim1 type “groups” in this tag with the object id we created in step 2 of group creation (Please see t he screenshot below for reference). In the new claim type section, I made isadmin false intentionally to make this group act as content author.

- AzureGroupTransformation: Uncomment this tag and place it after the AzureADUserToAdminUser closing tag. Again, update the value of claim type groups with the object id of the group created in step 2 as in above image.

Note: Once these values are updated, restart the app pool of the identity server to reflect the changes.
Once you complete the above steps you will be able to login using Azure login button.

Note : Since I made this group to act as a content Author that’s the reason we are seeing this specific user is acting as content Author.
Conclusion: In this blog I have integrated AzureAD with Sitecore identity server so that a user can Login to Sitecore 10 CMS using AzureAD .

