LNG LogoLNG Logo
    • Enterprise App Development
    • Product Architecture Design
    • Data Engineering & Analytics
    • Cloud Consulting Services
    • AI-Enabled Applications
    • Remote Engineering Teams
    • UI/UX Design
    • Data Migration
    • Big Data
    • DevOps Solutions
    • Banking
    • Ecommerce
    • Fintech
    • Healthcare
    • Hospitality
    • Manufacturing
    • Telecom
    • Travel
    • Education
    • Cross-Platform & Web Development
    • Digital Experience Platform
    • Enterprise Technologies
    • Modern Frontend Interface
    • About Us
    • Blog
    • Our Team
    • Careers
    • Success Stories
Let's Talk !

Deploying Sitecore XM Cloud on Netlify | L&G

By: Koushik MukherjeeJune 20, 2025

Netlify and Vercel are two cloud-based platforms in the JamStack ecosystem that are officially recommended by Sitecore for deploying frontend (Next.js) applications. These platforms support both Server Side Rendering (SSR) and Static Site Generation (SSG).

In this blog, we’ll walk through the steps to deploy a website integrated with Sitecore XM Cloud using Netlify, which offers first-class support for Next.js.


Prepare the GitHub Repository


  1. Create a public GitHub repository and commit/push your code.

  2. Set environment-specific values in the .env file.

  3. If you’ve made content or layout changes in your local XM environment, use the Sitecore CLI to publish your changes and verify the content is available on the Experience Edge.

  4. In your XM Cloud instance, publish all changes you want reflected on your live site.

Continuous Deployment Setup in Netlify

  1. Register and create a free Netlify account, then log in.

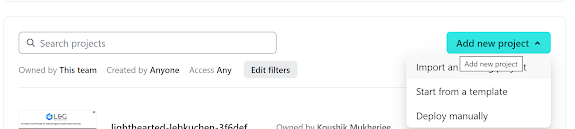
  2. Click “Add new project” and choose “Import an existing project”.
     

  3. Since the Next.js project is hosted on GitHub, select “GitHub” and authorize your account.
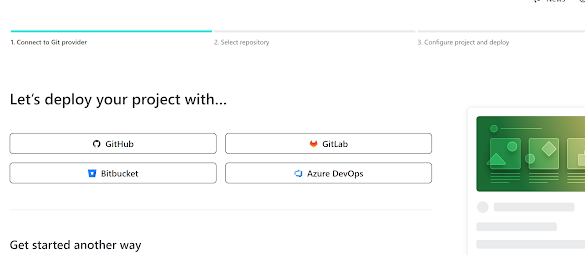
  4. Select the repository you wish to deploy.
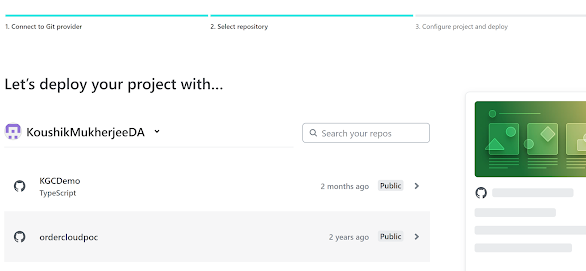
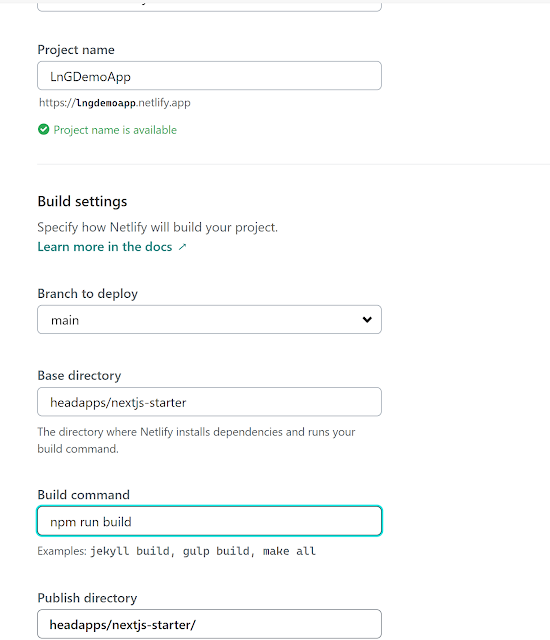
  5. Once selected, Netlify will detect it as a Next.js project and populate the default build settings.
    In our case, the Next.js app resides under headapps/nextjs-starter, so update the path accordingly.

    • Build command:
      npm run build

    • Publish directory:
      headapps/nextjs-starter/.next


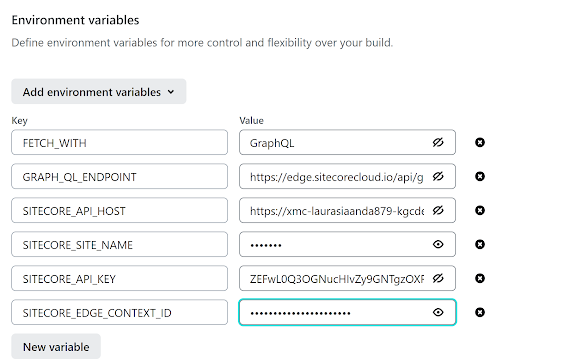
  6. Set the environment variables manually using key-value pairs (or import from .env). The required variables are:

    FETCH_WITH
    GRAPH_QL_ENDPOINT
    SITECORE_API_HOST
    SITECORE_SITE_NAME
    SITECORE_API_KEY
    SITECORE_EDGE_CONTEXT_ID

  7. Click “Deploy site”. If the deployment is successful, you’ll see a deployment log similar to this:
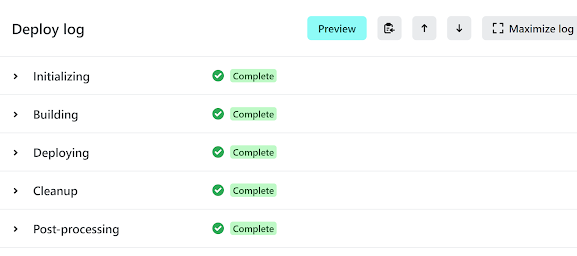
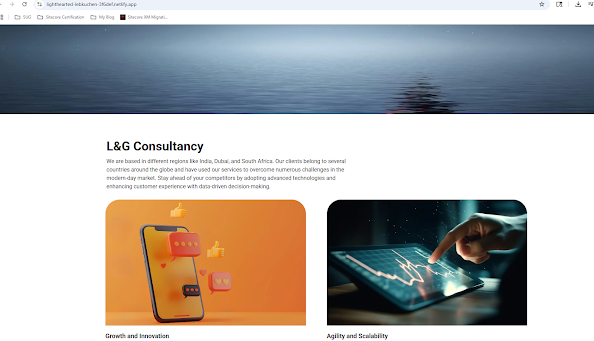
  8. Once deployment is complete, verify that the deployed app is rendering correctly on Netlify.
Configure Webhooks to Redeploy on Content Update

To automate redeployments of your Next.js app when new content is published to the Edge Delivery Platform, configure webhooks:

  1. In Netlify, navigate to:
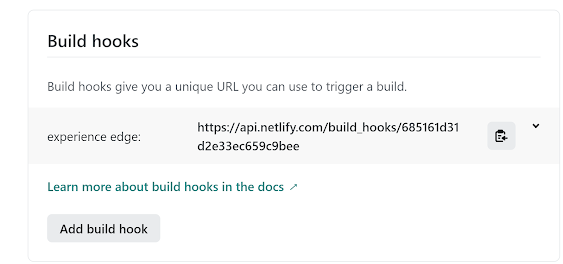
    Project settings > Build & deploy > Continuous deployment > Build hooks

    • Provide a name like “experience edge”

    • A unique build hook URL will be generate
  2. Open the Experience Edge Admin API URL and set up authentication.

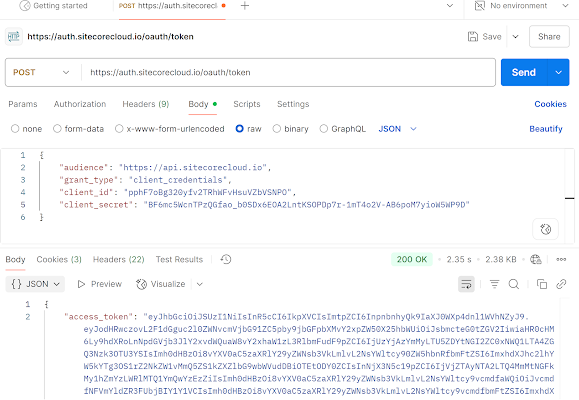
  3. To generate a bearer token, make a POST request to:
    https://auth.sitecorecloud.io/oauth/token
    Include the following in the request body:

    audience: https://api.sitecorecloud.io
    grant_type: client_credentials
    client_id: <your-client-id>
    client_secret: <your-client-secret>

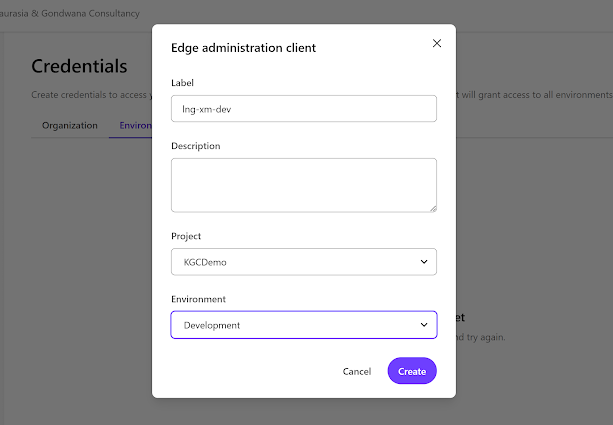
  4. You can create the client ID and client secret from XM Cloud Deploy App under:
    Credentials > Environment.
    Provide a label, and select your project and environment to generate the credentials.
     

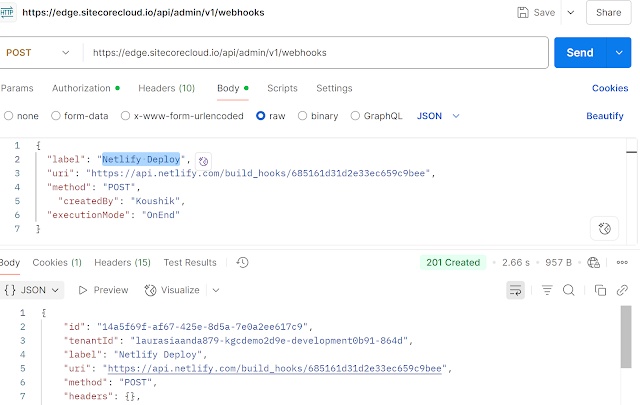
  5. Send a POST request to the webhook creation endpoint using Postman:

https://edge.sitecorecloud.io/api/admin/v1/webhooks

Request body:

json
{
“label”: “Netlify Deploy”,
“uri”: “<your-netlify-build-hook-url>”,
“method”: “POST”,
“headers”: {
“Authorization”: “Bearer <edge-authentication-token>”,
“Content-Type”: “application/json”
}
}
        You should receive a 201 Created response to confirm success.
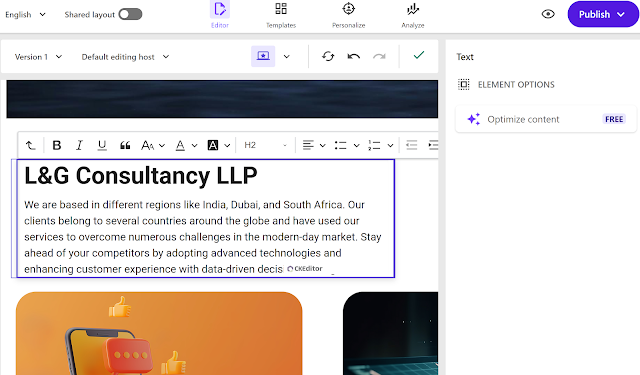
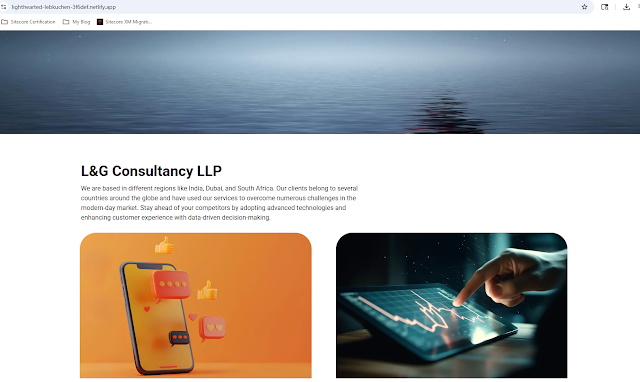
    6. Now, update some content in XM Cloud (e.g., change the title from “L&G Consultancy” to  “L&G Consultancy LLP”) and publish.


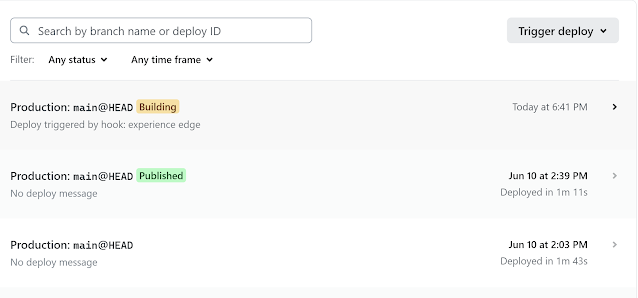
    7. Within a few seconds, you’ll see a new deploy triggered from Experience Edge under the Deploys  section in Netlify.
    8. Finally, verify that the updated content is visible on your live site.
 

Conclusion

Deploying a Next.js application integrated with Sitecore XM Cloud on Netlify is a streamlined and efficient process, especially with built-in support for continuous deployment and Experience Edge. By configuring environment variables and webhooks properly, you can ensure your site is always up-to-date with the latest published content. This setup offers a scalable and developer-friendly approach to modern Jamstack deployments backed by enterprise-grade CMS capabilities.


References

Deploy your front-end application to Netlify
XM Cloud Admin API
Hosting your XM Cloud App on Netlify

Continuous Deployment in NetlifyDeploy Sitecore XM Cloud to NetlifyJamstack Deployment for SitecoreNext.js Hosting with NetlifySitecore Experience Edge WebhookSitecore XM Cloud Webhook Setup
Two CMSs, One Website: Managing Routing During WordPress to Sitecore MigrationJune 17, 2026Mastering Identity Resolution in Sitecore CDP: Anonymous to Known VisitorsMay 25, 2026

Let's Innovate, Collaborate, Build Your Product Together!

We turn your unique ideas into exceptional results. Contact us to
scale your tech capacity and accelerate business growth.

Let's Talk!
Where We Are

Our Global Presence

Delivering world-class digital solutions from three strategic locations across the globe.

South AfricaSouth Africa
ZACape Town

4th Floor, Mutual Park, Pinelands, Capetown, South Africa - 7405.

UAEUAE
AEDubai

FZCO 421, Dubai Commercity, Dubai, United Arab Emirates.

IndiaIndia
INAmritsar

SCO 6, Floor - 5, Dua Square, Ranjit Avenue, Block - B, Amritsar, Punjab, India - 143002

Logo

AI-Fuelled software agency, helping business professionals to thrive. Trusted by global leaders.

Company

  • About Us
  • Blog
  • Our Term
  • Careers
  • Success Stories

Services

  • AI-Enabled Applications
  • Big Data
  • Cloud Consulting Services
  • Data Engineering & Analytics
  • Data Migration
  • DevOps Solutions
  • Enterprise Application Development
  • Product Architecture Design
  • Remote Engineering Teams
  • UI/UX Design

Industries

  • Banking
  • Ecommerce
  • Fintech
  • Healthcare
  • Hospitality
  • Manufacturing
  • Telecom
  • Travel & Transport
  • Education

Technologies

  • Cross-Platform and Web Development
  • Digital Experience Platform
  • Enterprise Technologies
  • Modern Frontend Interface
Logo

AI-Fuelled software agency, helping business professionals to thrive. Trusted by global leaders.

Company
  • About Us
  • Blog
  • Our Term
  • Careers
  • Success Stories
Services
  • AI-Enabled Applications
  • Big Data
  • Cloud Consulting Services
  • Data Engineering & Analytics
  • Data Migration
  • DevOps Solutions
  • Enterprise Application Development
  • Product Architecture Design
  • Remote Engineering Teams
  • UI/UX Design
Industries
  • Banking
  • Ecommerce
  • Fintech
  • Healthcare
  • Hospitality
  • Manufacturing
  • Telecom
  • Travel & Transport
  • Education
Technologies
  • Cross-Platform and Web Development
  • Digital Experience Platform
  • Enterprise Technologies
  • Modern Frontend Interface

Copyright © 2026 L&G Consultancy. All Rights Reserved.
Privacy PolicyTerms and Conditions
Company Image